
Moparts Tech Archive
Big Block
Stage V Flow numbers
By fast68plymouthfast68plymouth
Moparts Member
Posts: 3652
From: so burlington,vt usa
Registered: Aug 2000
posted 01-17-2003 11:07 PM
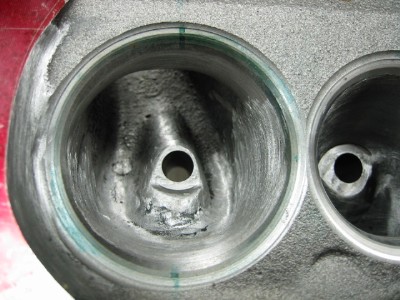
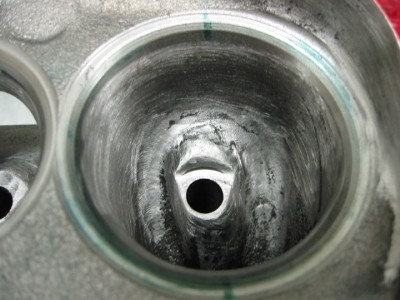
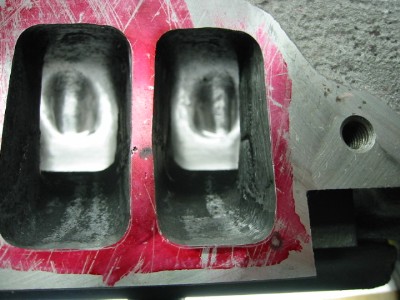
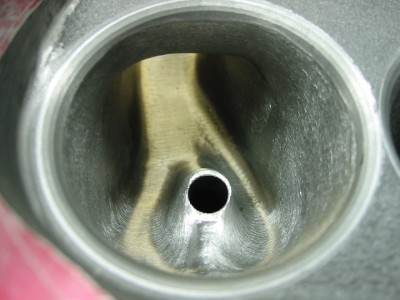
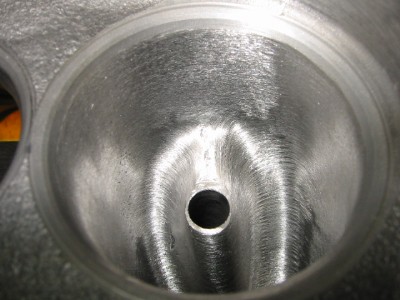
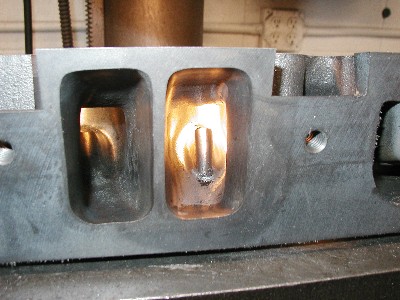
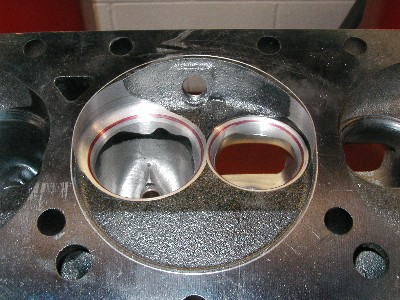
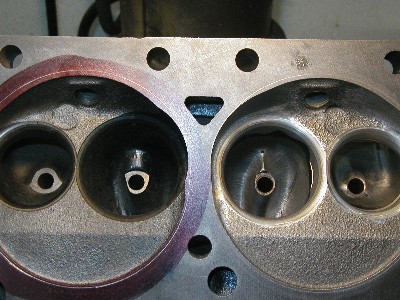
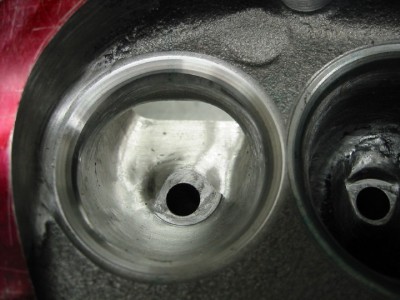
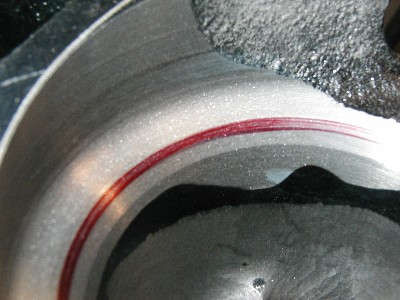
well...i finally have a set of stage V heads in the shop. a board member sent them to me to have some hardened seats installed, and a little detail work on the seats and possibly a little port work as well.
from what it looks like, and from the emails we've exchanged, it looks like these have been pocket ported from the MP templates.
overall the work looks pretty good, and fairly consistant from port to port. this is about as nice a looking job as ive seen from any "home porter". ive actually seen work from shops that are supposed to be good at head work not look this good.
it doesnt look to me like the templates take the bowls out nearly as far as i would, even on a simple "bowl blend".
there isnt any major core shift concerns that jump right out at you, but i figured id flow a left and right cylinder anyway.
anyway...heres what they flow:
intakes-
lift----#1/#3
.100--65.4/64.9
.200-135.5/136.4
.300-200.0/198.8
.400-240.3/240.3
.450-246.7/248.3
.500-248.3/253.1
.550-243.5/245.1
.600-243.5/245.1
.650-243.5/245.1
.700-245.1/246.7
exhaust ports-
lift----#1/#3
.100--59.3/58.2
.200-121.5/121.5
.300-167.3/158.2
.400-177.0/172.1
.450-174.6/177.0
.500-173.4/181.8
.550-173.4/183.1
.600-173.4/183.1
.650-173.4/183.1
.700-173.4/183.1
as you can see...both intake ports just kind of stop gaining from about .450 lift on up.
the #3 exhaust port has a slightly better transition from the bowl into the floor than #1, which is why it went higher before stalling. however, it requires the bowl to be slightly bigger to get that shape, which is why the .300-.400 flow was better on #1. then from .400 up, the superior short turn form on #3 took over.
i wont be suprised if we end up losing a little exhaust flow at .100-.200 with the installation of the seats, and the quest for more reasonable flow at .400+....but im pretty sure i can get the intake to gain from .200 right on up.
for the type of combination the customer is looking for, i dont think we'll be trying to get more than 270ish@.550 lift, which will be about the net max lift of the cam.
===========================================
ccdave
Moparts Member
Posts: 711
From: Chicago burbs
Registered: Sep 2000
posted 01-18-2003 12:01 AM
I'm not a big fan of those templates. I like to follow the throat cut for a reference.
==========================================
fast68plymouth
Moparts Member
Posts: 3652
From: so burlington,vt usa
Registered: Aug 2000
posted 01-18-2003 12:09 AM
CCdave...thats pretty much how i do it too. the other big problem with the templates is the...
***WARNING- DO NOT UNDER ANY CIRCUMSTANCES TOUCH ANY PART OF THE SHORT TURN IN ANY WAY, SHAPE, OR FORM, OR AN INCREASE IN FLOW WILL OCCUR***
...that comes with the instructions...and scares everyone away from the area of the port that opens the door to the "big" numbers.
==========================================
451boy
Moparts Member
Posts: 5740
From: Oregon
Registered: Nov 1999
posted 01-18-2003 12:30 AM
So out of the box they must not flow worth diddly if even after some nice bowl work they only flow 250? Guess I'll have to keep recommending the E heads unless the customer has enough money to pay for a professional port job plus the heads.
===========================================
ccdave
Moparts Member
Posts: 711
From: Chicago burbs
Registered: Sep 2000
posted 01-18-2003 01:02 AM
Yes I have seen that warning on the short turn also. All I do to the short turn is radius the transition from bowl to port. I don't think doing that is to radical of a change to the short side radius. After a throat cut that short side transition can be very sharp and steep on the BB Mopar heads. You would think the template instructions would tell you to smooth that edge off.
=======================================
Johns dart
Moparts Member
Posts: 265
From: Victoria B.C. Canada
Registered: Mar 2002
posted 01-18-2003 02:04 AM
Does it say increase or decrease?
==========================================
Prochargedmopar
Moparts Member
Posts: 1613
From: W. of FTW...Granbury, Tx
Registered: Sep 2001
posted 01-18-2003 05:18 AM
I think that was a sarcasim "increase" because they are always saying not to touch it..
========================================
Mopar Phil
Moparts Member
Posts: 437
From: Windsor, Ontario Canada
Registered: Feb 2002
posted 01-18-2003 10:25 AM
Fast, you might as well have my heads in your possesion because that is how they looked, and that is about how they flowed, right about on the money. However, when I bought the templates to verify the port work, 2 on the intake and 2 on the exhaust required more work. They looked good to the eye. The pics I mailed you were mostly (the black sooty ones were as received), of the revised work and continued interpretation of how I would blend the work. In other words "what mopar should have done". BUT, as always, mopar says "that's all you really need to know (or do), any more is just a waste of time, effort, and $." (Larry Sheppard, Hales Performance, etc.). Gee Fast, you think if I do the opposite of what mopar says, I'll find improvement?. On the conservative side if I could keep the good low lift #'s and increase the upper flow to 280 intake, and 220 exhaust at .600 lift, I feel that would be a great street head. If I do the 'radical', and stray from mopar preaching, I wind up with a race head that doesn't work well with my version of 'street'. Afterall, an aluminum head is what I should use for racing the rail, the V's are only a stepping stone that I got a great deal on. A few more questions Fast. With the flow #'s we have seen, what cam/compression are the factory V's best suited as supplied from mopar? Are they in any way superior to a ported iron OE head? Thanks in advance, Phil
===========================================
Streetwize
Moparts Member
Posts: 1604
From: Charlotte,NC USA
Registered: Dec 2000
posted 01-18-2003 11:29 AM
Well there's 2 sets of V's "in play" right now, Chuck at Best Machine has mine, hopefully things will get educational around here shortly. He said he'll be doing a bunch of chamber unshrouding on mine and will pretty much leave the port X-section about where it is, i.e., blueprint 906 size.
He also said there's a fair bit more of the pushrod pinch that can come out. As a Bonus, we should hopefully get some data on the Indy Dual plane I bought from Scott Brown, chuck seems to think this will be a very good match for the 508.
I can't wait to finally "Bust some Molecules" in this beast!
Wize
==========================================
fast68plymouth
Moparts Member
Posts: 3652
From: so burlington,vt usa
Registered: Aug 2000
posted 01-18-2003 05:17 PM
Pro, youre right....that was an attempt at sarcasim.
Phil, the V's look like they have a lot of potential, and i dont think 280/220 is out of the question at all.
although "some" low lift flow might get lost in the process.
however...i'll trade 20-30cfm@.500 and up for a couple of CFM at .100-.200 any day.
Wize...these seem to be a fair amount bigger than a set of even mildly ported 906's( or any other non-MW stock head).
the pushrod pinch is over 1.080 without any work done to it, and the exhaust port openings are quite large too(larger than what i open up a stock head to thats fully ported).
the surface texture of the casting inside the ports is quite rough though, so at a minimum i'll run something through the length of the runner to knock off the large chunks.
the owner has already polished the entire exhaust port.
==========================================
Mopar Phil
Moparts Member
Posts: 437
From: Windsor, Ontario Canada
Registered: Feb 2002
posted 01-18-2003 05:32 PM
Fast, you must have Gators heads, how do they look compared to my before/aft pics? Also, in your opinion, how do you see these heads compared to Eddies? I'm not talking #'s, but rather physical appearance.
==========================================
Streetwize
Moparts Member
Posts: 1604
From: Charlotte,NC USA
Registered: Dec 2000
posted 01-18-2003 05:40 PM
Dwayne,
I'm really glad you finally got your paws on a set, I'm sure you'll get all that can be gotten out of them for what your customer (and I'm thinkin it's got to be Alligator)wants them to do. I'd really be curious to hear an Intake/exhaust port Comparison to the Edelbrocks.
The first thing I noticed about them is the roof and floor are slightly but notably higher and there is a straighter "Line of Sight" to the Intake valve, particularly to the outermost side of the valve stem. I think the port roof/fllor contour difference may not effect the bare bench flow so much as it does when it is coupled to a suitably matched manifold runner.
Gator(?), your heads are in good hands!
Wize
====================================
alligator
Moparts Member
Posts: 563
From: indiana,u.s.
Registered: Feb 2002
posted 01-18-2003 08:06 PM
folks those are my heads. hope we can keep this discussion going and get some good info. i probably ought to post what i'm doing so folks can know where we're coming from. i have a 1965 coronet 440 2dr hdtp. i'll be using a 68 440 block. .020 kb184 pistons, steel crank, cat crs6760 rods, 70 six-pak set-up, stage 5 heads 2.14-1.81 manley valves, probably 2" tti headers (my 1 7/8 won't fit), 2 1/2" exhaust, torqueflite with a 66 street hemi converter, probably 3.55 gear. haven't bought a cam yet, i'll wait fast's results.
my intentions are to build a 99.5% street car (test&tune for fun with friends once or twice a year). strictly unleaded fuel. i would like a performance level of mid 12's around 110-112mph thru the mufflers. the suspension will be for the road. not drag race. i live 15 miles south of indy and the majority of car things i like are at least 100 miles away. i want to drive to the classics, nats, and my favorite car event the newport indiana hill climb. some of this is 200+ miles away. thanks to everyone for support and tips.
=========================================
classracer
New Member
Posts: 7
From: Winter Park, Florida, USA
Registered: Dec 2002
posted 01-19-2003 01:18 AM
Mopar refers to the stage V heads as a replacement for the 906 etc. Out of the box, that is about all they are. There is a lot of potential there, and as usual the key area's are where Mopar tells you not to go. I have spent a lot of R&D time with the stage V's using the smaller 2.08/1.74 valves. I have seen flow numbers of 320I/235E @ .750", but what impressed me the most were the mid lift numbers. I would think that using the bigger valves would allow for more improvement. Jim
========================================
Mopar Phil
Moparts Member
Posts: 437
From: Windsor, Ontario Canada
Registered: Feb 2002
posted 01-19-2003 10:09 AM
Classracer, thanks for the input, but do you have any hard info to share, ie.: areas where flow increase dramatically make a difference, or which areas combined make the most difference, flow #'s, etc. I very much would like to believe that mopar is not telling us the truth about how to port the V's. BUT, respected established shops (like Muscle Motors), don't like them at all, don't even want to work on them. This is why I have a dificult time making a decision on which way to port them. If I had numerous sets to play with, even I could figure this one out, but I don't, that's why this topic is important to me.
==========================================
Streetwize
Moparts Member
Posts: 1604
From: Charlotte,NC USA
Registered: Dec 2000
posted 01-19-2003 10:23 AM
Gator,
As for mid 12's, My Charger was in the 12.30's @111 on Drag Radials with my "nuthin fancy" bowl blended V's BEFORE I sent them off; with Fast's work on my combo I have no doubt the combo would have be 1-2 tenths quicker than that. I think you can rest easy, I'll be curious on what cam ol' Dwayne's gonna pick for a 99% street car, I don't think the 'Cam Master Catalog' in his head lists anything smaller than 260 @ .050!
Phil,
Between Dwayne and Chuck playing with these things, we're bound to learn something pretty soon. I'd love to hear some more specifics from Classracer as well. As for Muscle Motors, well...20 years of misinformation has taken its toll, I remember Chuck Senatore Dissing them years ago, but I know it takes a lot of JB Weld an a table full of grinding bits to get a 906/452 anything close to what both Blowncuda and Classracer (320I/235E, CR with stock valve sizes, no less!) have gotten out of them with meat left over. Both Dick Landy and Steve Dulchich have had pretty good luck with them, Now give Dwayne a few days to figure these things out and then we'll see what happens!
IF MP would sell them for $500 a pair bare instead of $800 in a potential performance per $ comparison they could potentially be even a better buy than the Edelbrocks, particularly to those who want to keep a stock appearing engine bay.
Wize
==========================================
alligator
Moparts Member
Posts: 563
From: indiana,u.s.
Registered: Feb 2002
posted 01-19-2003 11:14 AM
street-wize, dwayne shares your sentiments on power potential. i'm just trying not to be "greedy". i've already rebuilt the suspension with .92 t-bars and late model street hemi leaf springs. it'll probably be more of a tire squealer than launcher. i figure i'll need a few extra hp to power thru on the big end.
============================================
Mopar Phil
Moparts Member
Posts: 437
From: Windsor, Ontario Canada
Registered: Feb 2002
posted 01-19-2003 11:30 AM
Wize, I am impressed with what Classracer says he has achieved with stock size valves. This is why I attempted to persuade a little more info from him. Or is it a 'classracer' secret? My lack of knowledge on some porting terminology (words to the exact area) also leave me a little hesitant to get aggressive. I've read the Dulcich article, and have about half of the work figured out. Short side radius work intimidates me. I've got numerous 906, 516, and even a set of 915's that are too radical for street. Only 1 set of V's. I am totally convinced V's would make the ultimate 9 to 10:1 compression street head. No doubt they could easily be made a race only head. Somewhere between the 2 streams of thought is my personal challenge. Then I could off all the extra's and clear up alot of my life.
===========================================
Streetwize
Moparts Member
Posts: 1604
From: Charlotte,NC USA
Registered: Dec 2000
posted 01-19-2003 11:31 AM
Gator,
Yeah, but knowin' how ol' fast68's mind works and with something 'new' in his hands, he may give you the 11.5 second "Bonus plan" for no extra charge!! Dwayne is about flow potential, I've had the pleasure to have known just one other guy like that; someone who could actually "see" flow and where it's hiding, they don't rest until they find it.
If Dwayne was a blender, he'd have 2 speeds, "off" and "Puree", no use for that "mix-grind-chop" crap!! Telling Dwayne to just do a bowl blend is like telling Michaelangelo to "Just paint it blue"
Wize
==========================================
alligator
Moparts Member
Posts: 563
From: indiana,u.s.
Registered: Feb 2002
posted 01-19-2003 12:46 PM
street-wize, if nothing else all the chat is fun. i'm sure fast won't leave the issue in doubt. phil, just hang on. lets see what the tally is.
there really isn't any way that i could produce a set of heads out of my garage that would match professional work.
=======================================
Part 2
fast68plymouth
Moparts Member
Posts: 3652
From: so burlington,vt usa
Registered: Aug 2000
posted 01-19-2003 06:08 PM
well, ive had a little chance to fool around with one of the stage V's a little.
what ive discovered is, for someone who isnt all that familiar with head porting, these arent going to be a huge improvement over an OE head with the same amount of effort applied in a "bowl blend" or template ported configuration.
the key word with these heads appears to be, "potential". they do appear to have plenty of potential, and at least one member here has gotten some very good results from porting them. however, they dont appear to yield very big numbers if all you do is adhere to the templates, and the general MP guidelines...
which is...stay away from the short turn. in that regard...they appear to be more like 906 heads, in that the short turn pretty much dictates where the port will go turbulent.
what im hearing is....MP warns not to try and use the same principles that work on OE heads to these heads because you will ruin them.
well....we already saw the numbers that making the bowls the size and shape of the templates will produce, and those werent any better than a bowl blended OE head with big valves. so, the question is...how much effort
does it actually take before we start to see the "big numbers"?
i decided i would take a different approach to each of the two previously tested ports to see how they would respond to the different modifications.
since the templates should leave the bowls in the "optimum" shape, im going to leave one set of bowls as they were from the templates, and on the other cylinder take an approach more like what i would do without the MP "warnings".
in the previous test, #1 had the lesser flow on both intake and exhaust, so i figured thats the one i would take my own
approach on, and #3 would get the bowls left alone.
im going to discuss the intake ports first, then the exhaust.
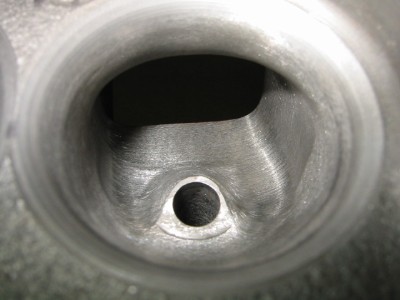
for the first step, all i did to #3 was blend the short turn into the bowl. yes, this is a MP "no-no", but i felt it definately needed to be done. this was about 5mins worth of work.
#1 on the other hand, got the seat remachined with 30/45/60 deg angles, with a .040 wide seat angle(45), and then i followed that up with a 75deg bowl cut, leaving the bottom 60deg angle about .100 wide. i then blended the freshly machined area into the rest of the bowl, and put a nice smooth radius on the short turn from the floor into the bowl.
this was probably about 10mins worth of grinding, plus the time machining the seat.
here is what they flowed like that:
lift----#3/#1
.100--64.9/64.9
.200-137.3/138.2
.300-202.5/203.7
.400-248.3/246.7
.450-264.3/261.1
.500-264.3/267.5
.550-261.1/259.5
.600-256.3/257.9
.650-257.9/257.9
.700-257.9/259.5
this shows us a couple of things. first is the valve seat alone doesnt do anything special. second is that the short turn was a big problem before. and third, a simple bowl blend works as good as the templates do.
we did "some" short turn work, and to be honest this was more than im sure anyone would do when the instructions say to not do anything there.
i took a fair amount of material off the short turn even on this one small test.
we can see there is still a turbulence problem, which means we need to reshape the turn even further, or slow the air down as its going over the turn, or both.
i decided to do a little of both.
on #3, i did a little streamlining of the guide boss, and rolled the short turn back a bit more. also, since most home porters seem to like making things "smooth", i also went in and knocked all the chunks off all the runner walls, floor, and roof, and then did a very quick, light, polish with a 60 grit sanding roll.
on the #1 cylinder, i got a little more serious with the guide boss trimming, and took a little material off the floor the entire length of the floor.
i also raised the roof a little on the area above the short turn. then i laid back the short turn even a bit more than i did on #3.
in addition to the guide work, i also opened up the bowl diameter some, and made the outside wall, and the back of the bowl more "vertical".
however, since its a street motor and really doesnt need smooth and shiney intake port walls....i left them with the semi-rough finish you get from a std double cut carbide, which isnt smooth, but its still smoother than the finish these heads had as cast.
those mods yielded these results:
lift----#3/#1
.100--65.9/64.9
.200-139.1/138.2
.300-204.9/206.1
.400-251.5/253.1
.450-261.1/267.5
.500-265.9/270.7
.550-270.7/278.7
.600-272.3/284.8
.650-272.3/284.8
.700-273.9/284.8
all bullshitting aside...this is probably a better form on the short turn than most home porters would get unless the had a fair amount of previous experience, and had access to a flow bench.
as i said earlier, the valve seat alone wasnt worth anything....but coupled with a back cut valve does start to pay off.
this is #1, same as above but with a 30deg back cut added to the valve:
lift---#1
.100--72.0
.200-149.1
.300-213.4
.400-257.9
.450-270.7
.500-272.3
.550-282.0
.600-286.6
.650-284.8
.700-284.8
so, the numbers are finally starting to come around, but this is waaaaay more than a bowl blend.
exhaust info to come later.....
dulcich
Moparts Member
Posts: 558
From:
Registered: Jul 2001
posted 01-19-2003 06:50 PM
Yup, stock or stage 5, you've gotta do the short turn. Mid 280's is very good for a bowl blend and short turn job. Like the 906, the 5 has quite a sharp drop off the short turn, and there's no way the air is going to make it around there once it get moving fast at higher lifts (flow levels). By the same token, mid 280's would take quite a lot more cutting with a 906, probably a full-on porting job by most porting pros.
=========================================
gregsdart
Moparts Member
Posts: 2043
From: frostbite falls Mn USA
Registered: Jan 2001
posted 01-19-2003 07:04 PM
Fast, nice work on the heads. Confirms what i always thought of these heads, a good replacement head for a cracked stocker.
Mp just needs to get a clue and lower the price to a point that they would be worth buying by home head porter types or as a replacement head.
============================================
451 Jim
Moparts Member
Posts: 3074
From: Lexington Park Maryland
Registered: Dec 2000
posted 01-19-2003 07:12 PM
Now those heads can make power! That looks better than the owner expected for his application. Good flowing and I expect less crack prone than 906 heads ported to that flow.
===========================================
Sport
Moparts Member
Posts: 745
From: Canton, Ohio. USA
Registered: Jan 2002
posted 01-19-2003 07:26 PM
Nice work and good info. If I had a set of steel heads that flowed like that I would have to be hard pressed to buy the Eddys. Thanks for your efforts.
==========================================
73Chargerkid
Moparts Member
Posts: 2290
From: San Marcos, CA
Registered: Jan 2001
posted 01-19-2003 07:32 PM
make sure you check the bolt holes and the chambers to make sure everything is correct this time first Dwayne . Are the seats in these heads the same limiting size that are in the Stage 6's?
======================================
Streetwize
Moparts Member
Posts: 1604
From: Charlotte,NC USA
Registered: Dec 2000
posted 01-19-2003 07:54 PM
Dwayne,
Yeah that's about where my head porter left off, only you did it with a smaller valve. I think any way you look at it, in the RIGHT SKILLED HANDS you are in full port 906 territory without a lot of work, just the right work. The 258CFM @.400 is gonna make anything in a .470"-510" lift street Hydraulic (which is in the range of where ~75% of 383-440's get built) come alive regardless of where the peak flow goes from there, If I'm not mistaken that's better than an out of the box Eddy. It also looks like they're within ~5cfm of the near-full tilt 906s on your recent post and out-flow at all points the factory ported heads used in the Edelbrock dyno test. But that said, also notice that for all the additional work the ~400 and lower numbers don't really gain dramatically, so unless someone is running a .550"+ lift cam, additional porting beyond what you outlined is probably not really neccesary.
If you went no further, Gator has a great street head and I feel some satisfaction in knowing that your efforts back up what I'd been telling people for years.
Wize
===========================================
fast68plymouth
Moparts Member
Posts: 3652
From: so burlington,vt usa
Registered: Aug 2000
posted 01-19-2003 08:27 PM
now for some exhaust port info.....
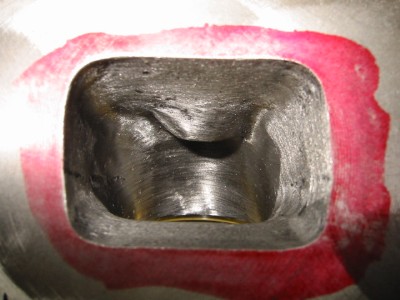
the exhaust ports, as they come, dont appear to really make much "sense".
the floor is built up with a fair amount of material(so you would be able to
make the short trun the desired shape), but the back side of the bowl, and the roof near
the short turn are filled right in. this doesnt provide a very large area for the
air to pass through, and unless some short turn work is done, the path the air
column has to make on that side of the port first heads away from the port exit, then back around the turn, and out of the head.
it also looks like the peak of the mound in the short turn is actually slightly higher than the bottom of the port exit.
generaly, ive found the lowest point of the exhaust port should be the bottom of the port exit.
so, that means either fill this one up.....or lower the hump a little.
i also like the roof and the floor to more or less be parallel lines with each other, which these are definately not.
for the first step, on #3 i simply improved the transition from the bowl to the short turn, but didnt remove any height from the floor.
on #1, i remachined the seat with a 40/45/radius cutter, and blended the new valve job into the rest of the bowl, and again improved the transition of the seat into the short turn. i also made the back side of the bowl a tiny bit steeper, to try and get it to be closer to parallel with the floor.
that ended up not doing much to either port, although it did make #1 become better than #3 by about 3cfm, and at first it trailed #3 by about 10cfm.
this was again about 5mins worth of work on #3, and closer to 10mins on #1, not including remachining the seat.
i also want say that in both this stage, and the previous template only stage, the ports sound awful on the flow bench. the best way i can think of to describe it it "dirty". they both had a very coarse, raspy sound, which is usually a sign that something isnt quite right with the shape of the port.
anyway....here is was a slightly improved radius from the seat to the short turn gets you:
lift----#3/#1
.100--54.2/57.2
.200-120.0/120.0
.300-158.2/167.3
.400-169.7/184.3
.450-177.0/184.3
.500-181.8/185.5
.550-183.1/186.7
.600-186.7/187.9
.650-186.7/189.1
.700-186.7/190.3
so, on #1 a couple of cfm lost from .200 down, even at .300...then a nice gain from there up.
#3 however had a loss of a few cfm at low lifts, and barely gained anything up top.
clearly a littl more work needs to be done, and since #1 responded well to a bit more grinding, its reasonable to assume #3 would as well.
for the next step thats what i did with #3. i left the back and sides of the bowl as they were, but took the floor and made it a smooth radius from the seat to the port exit, taking off some height at about the mid point of the runner floor. its getting closer to being parallel to the roof now.
for #1, i gave the floor the same treatment, but widened the port opening on the outside wall by .050, and raised the port exit by .050 as well.
i removed a little more material from the back side of the bowl, streamlined the guide, opened up the area next to the guide boss, increased the bowl diameter a "tad", and then repolished the entire port.
here is how they compared after that:
lift----#3/#1
.100--53.6/57.2
.200-120.7/117.1
.300-168.2/168.2
.400-187.9/200.0
.450-192.8/202.5
.500-196.4/202.5
.550-201.8/203.7
.600-203.7/204.9
.650-206.1/207.3
.700-206.1/209.7
while thats starting to look more like it should, the ports still dont sound all that good, and the #1 port has quite a bit more work in it, and more area everywhere, and didnt seem to be flowing much more
air.
time to try the flow tube and see how they compare with a 2" "header" installed.
with tube:
lift----#3/#1
.100--57.2/57.2
.200-128.7/122.9
.300-178.2/176.4
.400-202.5/214.6
.450-209.7/225.5
.500-214.6/234.0
.550-219.4/241.9
.600-223.1/246.7
.650-224.3/254.7
.700-226.7/257.9
so, clearly "something" is going on with #1 as the air leaves the port without the tube installed, giving us a poor reading.
with the tube installed the difference in the port area starts to really show up.
at this point im thinking....this is sort of a lot of work for 285/204cfm @.600 lift from an aftermarket set of heads.
i remember hearing people say the stage V's werent really much better than an OE head, and from what i can see, unless you spend the time trying to use up some of that "potential"....thats a fairly accurate statement.
===========================================
fast68plymouth
Moparts Member
Posts: 3652
From: so burlington,vt usa
Registered: Aug 2000
posted 01-19-2003 08:43 PM
to be clear....yes, this was way less work to get to 285 intake flow than on any OE head(and way, way less than i had in my 290+cfm 906)....but its still more than a "quicky" bowl blend.
also, the be fair, even though the numbers arent that big at the really high lifts...the area under the curve is pretty good.
in that configuration, they would be easy 625+hp heads on a high CR 446 with a big solid cam and a 4500 carb.
73, there isnt any real intake "seat" in an iron head, so a 2.19 valve would be no problem. the seat is just machined into the iron.
however, this set of heads does have hardened exhaust inserts installed from MP....which i was under the impression was not how they came.
that'll save the customer a little $$$, which im sure he wont mind.
==========================================
mrw5
New Member
Posts: 24
From: carlisle, pa
Registered: Feb 2002
posted 01-19-2003 10:02 PM
just BTT good info and fast did alot of typing LOL.
===========================================
73Chargerkid
Moparts Member
Posts: 2290
From: San Marcos, CA
Registered: Jan 2001
posted 01-19-2003 10:11 PM
Oh ya, forgot about the cast in seats .
=========================================
451 Jim
Moparts Member
Posts: 3074
From: Lexington Park Maryland
Registered: Dec 2000
posted 01-19-2003 11:38 PM
"that's better than an out of the box Eddy"
But at twice the cost? Porting ain't cheap! And the ported Eddy went well over 300 cfm, and still cheaper. Money talks...
============================================
Mopar Phil
Moparts Member
Posts: 437
From: Windsor, Ontario Canada
Registered: Feb 2002
posted 01-20-2003 12:10 AM
So this leaves me, the homeporter without a flowbench in a not so good situation. I've only attempted shortside radius work on my radical 906 heads. I didn't get them flowed, and they are already installed on the .590, 13:1 440. I tried to copy a set of professionally ported heads to the best of my abilities, without getting carried away. I was hoping my V's, further modified by me would be an improved head to try in the future (until I could afford some pro finished aluminum heads). Now I'm not sure that I could do the required work myself. I need to be able to see and feel modified heads to imitate/recreate. I might as well finish both heads the same and just use them on my street mule (440 Volare). I'm sure a mid 12 is attainable (12 flat was the goal with room). This is a car I try to drive whenever I can, and have retired from racing since I got the FED 10 years ago. The Volare was always a consistant contender, but not fast enough at 4,000 lbs., with my definition of 'street'. The rail goes fast with little effort because of it's lighter weight/effective chassis. Nearly 4 seconds difference in ET due to weight with a near identical engine. Thanks for your efforts Fast, you gave me some answers/direction. I think I know what I have to do with the limitations I have.
===========================================
classracer
New Member
Posts: 7
From: Winter Park, Florida, USA
Registered: Dec 2002
posted 01-20-2003 01:53 AM
Phil: Some basic points on the Stage V starting from the intake face. Just square up the ports. You will find that the casting is most likely core shifted. You will need a reference point to center up the ports. I place the head with the chambers facing up, and scribe lines off the head bolt and oil feed holes. From these lines you can develope a centering line for each pair of intake ports. This is much more accurate than just tracing a gasket. When you do square up the intake port opening, make sure it is not smaller than the size of the port in the intake manifold. I have seen a mismatch in this area cost over 20 cfm. The dog leg area will also need to be squared up and evened out between all the ports. This area in the Stage V is already bigger than other stock castings. Do not make this area too big unless you have a well developed port flowing over 300 cfm. Do blend this dog leg area to as large a radius as possible.
In the bowl area do not make it any bigger than about 90% of your valve size( Example: 2.14"x90%=1.926")That is if you had a 1.92" valve it would slide all the way into the port bowl, and a 1.93" valve would not. This percentage changes depending on the amount of valve lift being used. Once again, because of core shift you will have to grind some areas more than others. Blend the bowl area into the port roof. Narrow and blend the guide boss into the roof also. There is some flow available behind the guide boss. This area is cast thicker than on a 906 casting. Just follow the shape of the bowl, but keep it close to the guide. Even with the extra metal there, you still do not want to dig too deep there. Please refer to picture 3 and 8 on page 42 and 44 of Mopar Muscle June 2001. The short side need to have a nice rolled radius and a concave shape. It's hard to describe exactly how much metal to remove here. I will say that if you go too far you will loose flow, and if you go further than that you will strike water. The short side floor needs to be widened some. This added area slows the air a little and helps it turn. Something else I do is to make the radius on the floor larger on the side closest to the centerline of the cylinder bore. The radius of the floor closest to the side of the cylinder bore is flater and a little sharper.
I usually cut a 45 degree seat with a 15 degree top cut and a 60 degree bottom cut. The 15 degree top cut seems to help reduce reversion over a 30 degree top cut. I blend the 60 degree cut into the port. I will leave more of this 60 degree cut on the long side of the port as well as the side next to the exhaust valve.
I hope this rambling helps some and doesn't bore the rest. I you want I can go over the exhaust port too....Jim
===========================================
Streetwize
Moparts Member
Posts: 1604
From: Charlotte,NC USA
Registered: Dec 2000
posted 01-20-2003 06:51 AM
Jim,
To quote Led Zep..."Ramble on!!"
451Jim,
Easy there, big guy!
It looks like Fast only spent Maybe 30 minutes on each intake, vs 1 3/4 hrs on the last set of 906's, for someone who wants to stay Factory appearing (.ie, Iron heads) it looks like a viable option. A set of bare V's are still IMO retail about $300 too much, ($800 vs $500), but if you can pick them up this much with say $300-400 (8-10 hrs) porting plus ~$300 for valvetrain, you're not too far from eddys out of the box + the required longer head bolts.
That's all I'm saying there,
Wize
========================================
fast68plymouth
Moparts Member
Posts: 3652
From: so burlington,vt usa
Registered: Aug 2000
posted 01-20-2003 08:36 AM
actually....i sort of agree with 451Jim on this one.
i feel i work "pretty fast" on porting, but sometimngs just take time...reworking the short turn and hacking away at a guide boss are some of those things.
also, iron takes more time to remove the same amount of material as aluminum....even with the very aggressive cutters they have for iron. besides...those really arent the best choice to use for trying to sort out a short turn.
i have almost an hour into the port that flows 285cfm, and about 45mins in its matching exhaust port.
that works out to 14 hours to do all 8 cylinders.
Wize....i dont know what they get for porting where you are, but i get $45/hr....so 8-10hrs is $360-450, and to duplicate the #1 cylinder 8 times, at $45/hr is going to be about $630, not including remachining the seats....which werent all that concentric, and need to at least be "touched up".
E heads with "stage I" prep will go about 290cfm. thats a $400 job on top of the cost of the heads, so $1700 tops. and they're closed chamber(if you want them to be).
the V's with "comparable" flow are:
$800-castings
$75-machine and finish grind seats
$630-14hrs porting
$350-valves, springs, retainers, locks
$10-back cut intake valves
$60-final wash and assemble heads
---------
$1925
still over $200 more for iron heads with less flow, and 90cc open chambers.
thats not including cutting for dual springs(if you need them), or machining the guides to accept positive seals(needed with dual springs), two operations not needed for the dual spring upgrade on the E heads.
are they good heads? sure. are they cost effective? IMO, not as cost effective as some other stuff out there.
Phil, im going to do a quick guide trimming, and short turn reshaping on another cylinder just for you just to see how much you can gain from some simple, quick work. im sure it will be mid-260's anyway...which is better than where youre at now.
i'll test it like that, then recut the valve seats, and reblend...and back cut the intake valve.
i think if you dont really want to get carried away with the short turn work, that will be a nice gain in flow without a huge amount of material removed.
classracer....heck...i'd like hearing about the exhaust port work since im not really getting the numbers without the tube i think i should be...maybe im missing something obvious(or not that obvious).
for an easy comparison, here are some "out of the box" E head numbers:
intake flow:
lift-----#1/#7
.100---67.9/66.9
.200--139.9/130.9
.300--203.5/202.3
.400--248.1/248.1
.500--272.1/272.1
.550--278.5/280.1
.600--285.0/285.0
.650--285.0/285.0
.700--286.8/286.8
exhaust flow:
lift-----#1/#7
.100---55.6/56.6
.200--111.2/111.9
.300--159.3/144.4
.400--184.1/178.0
.500--199.9/190.2
.550--204.7/195.0
.600--208.3/197.4
.650--209.5/199.9
.700--210.8/202.3
not bad for less than $1300 complete.
===================
now for the latest:
i kept track of how long i spent doing each part of the process of taking one cylinder, and making a noticable improvement to both ports, without trying to re-engineer the whole port.
i started with a fresh cylinder, #7, which Gator had already template ported, and went from there.
the flow numbers from the template porting were nearly identical to the other 2 cyls, so at least if you follow the templates, you will get predictable, and repeatable results.....only the numbers just arent that high.
anyway....here is how it was from the templates:
lift----in/ex
.100--65.4/59.3
.200-137.3/121.5
.300-200.0/158.2
.400-240.3/174.6
.450-246.7/178.2
.500-249.9/180.6
.550-248.3/180.6
.600-248.3/181.8
.650-249.9/184.3
.700-249.9/184.3
for the intake port, i started there and trimmed down both sides of the guide, although i didnt raise the roof any.
then i opened the bowl diameter up from about 1.850 to 1.920. then i rolled the short turn back so that it is a very smooth radius from the floor to the seat.
all these operations were done with a sharp, aggressive carbide which left a very rough, and somewhat uneven finish.
then i took a std double cut carbide and deburred the entire port, and smoothed over the very rough finish the other carbide left around the guide, bowl and short turn.
i finished it up with a quick polishing of the entire port with a 60 grit sanding roll.
this is how long each step took:
9mins- narrow guide boss
5mins-open bowl
5mins-roll back short turn
20mins-debur entire port
12mins-mild polish
------
51mins-total
the exhaust port got less of a reworking, and since i hadnt yet seen any results that left me with a warm fuzzy feeling
on the exhaust side, i figured id try something slightly different.
i spent a very small amount of time detailing and narrowing the guide boss(farther than what was already done), and then just blended that work into the bowl. i did lay the short turn back quite a bit, but this time i induced a little concave shape into the floor instead of leaving it flat like it comes.
then i deburred the new work i had done, and polished it as the finl step.
that all took this long:
3mins-guide work
1min-re-blend bowl
6mins-short turn
4mins-debur
5mins-polish
-------
19mins
here is what i ended up with after that work:
lift----in/ex
.100--64.9/54.2
.200-137.3/119.3
.300-206.1/168.2
.400-251.5/189.1
.450-269.1/194.0
.500-269.1/196.4
.550-272.3/198.8
.600-277.1/200.0
.650-280.3/202.5
.700-283.6/206.1
im pretty happy with the intake port, but the exhaust is still a bit of a mystery.
this port, like the others, sounded awful both before and after the reworking.
since this isnt my head, and they arent going on a "race" motor, im hesitant to try anything thats too much of a departure from the as cast form. for sure, id love to know what the guys who are getting big exhaust numbers from these heads are doing to get them.
the next step on this cylinder is to remachine the seats, and back cut the intake valve.
==========================================
Streetwize
Moparts Member
Posts: 1604
From: Charlotte,NC USA
Registered: Dec 2000
posted 01-20-2003 10:45 AM
Fast,
Yeah $45/hr, I took an avearge of 9 hrs $405 to be exact. What do you want for 6.51AM w/o coffee?? It's about the same down here.
I guess was going from your original post/first mod with just the short-side work. As said before, More than 75% of street cars dont run .520"+ lift cams so I was looking primarily at .400"-.550" numbers only.
It's still a very respectable street head in that (typical .474/509 cam)range without a lot of work (compared to a 906/452 at least), but probably not cost effective to go full tilt with... but there again I for one never inferred that they were. It only goes to show that 600+ can be supported with an iron head without getting thin and crack prone. Thinking not only about drag racing but also for many circle track classes where aluminum heads aren't permitted. IIRC, some of the NMCA street N20 class doesn't allow aluminum either, at least they didn't.
BTW, I was still hoping to hear some comments on port shape comparison.
Thanks for all your work,
Wize
Update,
Chuck tested my heads as delivered and cleaned up, on his bench they went 264/197 vs. 280/204 on the bench down here. For comparison, out of the box Eddys go low mid 270's peak on his bench vs mid 280's on Fast68's. He said although the bowl port work was good on mine they were not exactly the approach he likes to take, therefore he may be somewhat limited in what he can do to mine. He's going to work on 1 port each and see what they'll do, from there I'll decide whether to finish them, or "punt". I figure if he can get them in the low 290's on his bench, by comparison that might be 300+ on other benches, but who knows? He said give him a week to 10 days to come back with a verdict. With a .610 lift roller I only really care about the .250-.650#'s what they'll do past .610 doesn't really come into play for my combo. We'll see.
=========================================
fast68plymouth
Moparts Member
Reged: 01/20/03
Posts: 50
just a brief update for those interested....and a little more info for Phil.
i went and remachined the valve seats the same as i had done on #1.
.040 wide 45 intake seat, with a 30 top, and 60 bottom angle. then i blended the existing bowl work up to the new bottom angle.
this only took about 2-3mins with a 60 grit sanding roll. im also using the back cut valve for this test.
on the exhaust, curiosity got the best of me. the 40/45/radius valve seat cut basically left the exhaust port unchanged, and i knew i wasnt too happy with the numbers, so i thought id do a little experimenting.
the back side of the bowls on the exhaust ports are filled in pretty good compared to a stock, or most aftermarket heads.
also, the roof near the guide seemed to be pretty low.
so what i did was deepen the trough next to the guide on the outside wall, and try and get the roof to be more or a parallel line to the floor.
i also removed a bit more of the port bias by smoothing out the inside wall a little.
well....the exhaust port is finally starting to come around, and the sound has improved quite a bit.
here is where i ended up:
lift----in/ex
.100--72.0/57.2
.200-148.2/123.7
.300-212.2/172.8
.400-257.9/196.4
.450-264.3/206.1
.500-270.7/210.9
.550-275.5/217.0
.600-280.3/220.6
.650-282.0/224.3
.700-283.6/226.7
clearly the intake port likes the back cut valve and narrow intake seat, and the exhaust responded favorably to the work i did there.
so Phil...you were looking for 280/220@.600....thats what it takes to get you there
while i had the sanding rolls out, i figured id polish the #1 port, which had been left rough previously, to see if there was a few cfm to be had there.
i was rewarded with a nice gain for most of the curve for about 15mins work.
lift---in
.100--72.5
.200-148.2
.300-212.2
.400-256.3
.450-272.3
.500-278.7
.550-286.8
.600-290.2
.650-288.4
.700-288.4
at this point, the only real difference between #1 and #7 are that i raised the roof above the short turn, took more out of the bowl above the guide boss, and have a bit more of a radius on the short turn on #1 vs #7.
im pretty much beyond the templates everywhere...so IMO, you can put those in a drawer somewhere.
how id describe what was done is:
intake:
-open intake bowl to 1.920
-reshape short turn to a proper form(i wouldnt describe what i did there as "minimal")
-narrow guide boss
-polish entire runner
exhaust:
-unbias port(as much as you dare)
-open trough next to out side of guide
-lower short turn, induce slight concave shape to port floor
-make back of bowl more vertical
i have no doubt these will make very good power in this configuration, but its just more work than i think someone should have to do on a set of $800 castings.
Wize, if you had the complete set of numbers for your heads from Chuck, and maybe a set of numbers for an E head on his bench(to compare to), i think that would be interesting as well.
from what you said, they are now about 10cfm shy of an out of the box E head, which is basically where i ended up with the #3 cylinder.
i'd like to see how the 2.19 valve compared on the bottom of the curve to the E head.
to summerize my feelings a little on these heads....if youre only going to do as much porting as the templates outline, then they arent any better than an OE head with big valves with the same amount of work.
if you take the time to do as much work as ive done here, then they really start to show some nice gains compared to the stock heads.
but....it does take that amount of work to see the benefit of the $$$ you spent on the heads.
========================================
Streetwize
Moparts Member
Reged: 01/20/03
Posts: 58
Fast,
Chuck's been monitoring what's going on. He said the previous valve job had an "old School" larger throat cut than he normally likes and it may limit what he can do overall. He said the gains will probably come from some chamber unshrouding and widening the untouched middle of the port to more or less even out the "Hourglass" pinch, ie, larger port entry/larger bowl skinny port. My heads on his bench went 262 @ .500 & .550 and maxed at 264 @.600. Marty's bench read 278-280 at the same lifts. The curves and % deviations at the various lifts are consistent so I feel pretty good that it's the differences in benches. Chuck said that out of the box Eddys go mid-high 260's in the same range and peak @ ~272 so yeah the old job was within 8-10 cfm. Not bad considering the $300 bowl clean up/port match Marty charged me for.
The saving grace is that although I believe Chuck likes to take more of a venturi or 'velocity' approach to porting, with 508" on tap a slight loss in velocity shouldn't be too big a problem. I'm sure He'll be comparing notes with you. Good or bad I'll post em up for sure.
I found your comments on the Exhaust particularly interesting, My old porter Tony Adkisson said he had a non-symetrical "D port" mod he made to the roof of 906's that worked extremely well but I never saw anyone else do that.
A Very Good thread and Dwayne, you know we really appreciate all the effort, at least we know the potential is there if you know where to look. Maybe you could make your own set of templates From Gator's heads and sell them! It seems of late that good hard-core tech talk is coming fewer and farther between.
BTW, Now that they are done how do the final port shapes compare/contrast with the Edelbrocks?
Wize
======================================
fast68plymouth
Moparts Member
Reged: 01/20/03
Posts: 50
IMO, the port shapes for the intake ports on the V's and the E heads are "similar", but i wouldnt say Ebrock copied the V's.
quite a bit of difference in the bowl area, and it seems to me the V short turn is actually higher(which should be better if both heads were fully developed).
the exhaust ports arent anything alike, and while the V's look like they have a "better" shape than the E heads, the fact is, the E head exhaust port works very well for what it is, and is quite easy to improve upon.
the V exhaust port requires too much material removal to get decent numbers from, IMO, and should be cast closer to the net final shape to begin with.
the 2.19 might be the ticket for the V's...but i wont have a chance to play with that on these heads.
=======================================
M_D
Moparts Reader
Reged: 01/19/03
Posts: 19
Loc: Wild West
Trying for a larger cross section someone might screw up a critical part of the port such as the floor, short turn and/or throat below the seats that hurt flow. But without welding or adding epoxy, as far as just cross section is concerned, IMO you can't cut enough out of a Stage V or '906 port for them to end up too big on a hot 508 street engine, let alone race.
=======================================
classracer
Moparts Reader
Reged: 01/21/03
Posts: 4
Loc: Orlando, Florida
Hey Guy's
Sorry for not getting back sooner. I just found this new thread tonight.
On that exhaust port; that loud roaring sound is very noticeable. It seem to start at about 160 to 180 cfm. It does take a little work to get the exhaust port working. Fast's flow numbers show that he was on the right track.
Fast: If you get some extra time: set the head up on the flow bench with the exhaust port facing you. Get a second manometer ( I made one from some clear plastic tubing) and some small copper or brass tubing. Probe the port; you will find an area just past the guide where the velocity is much higher. The port needs to be widened in this area. When you do this do not widen the port to far in, as this will kill any gaines you made. The roof of the port shoot upward just before it reaches the exhaust flange. Just as you did, I would try and make the roof parallel with the floor. Some thing I found on 906 and 452 castings that also helped the flow was to bevel the roof upward after I had made it parallel to the floor. It looked like a bigger version of a stock roof profile. I have not tried this on a stage V casting yet. I would also do a little welding to the port floor on the side closest to the center of the cylinder. This would fill in a small dead flow area and give the port a twisted look at the outlet.
Getting back to that funky noise in the exhaust port. What is happening here is the flow on the short side is seperating from the floor and intersecting the flow on the roof. This is what happens on the intake when the short side is too steep and the flow jumps across to the long side, except in reverse. This is hard to fix because the port is so short and turns almost 90 degrees When Fast raised the roof, he made the busiest area larger. When he reprofiled the short side, he helped the air flow turn and not intersect the main flow as much. The floor profile I use has a larger radius on the side closest to the cylinder center and a smaller more layed back radius on the side closest to the cylinder wall. I also use a tulip shape exhaust valve(20 to 25 degree backside angle). This seems to help the air flow turn in the port. I use your basic 30/45/70 degree cut on the seat The 70 degree cut is blended into the port. I leave more of the 70 degree cut on the long side of the port as well as the side closest to the intake valve. I will modify the margin of the exhaust valve to make it a nice radius( do not do this to the intake valve).
I'm sure I'm forgetting a few things here, as I have not touched a stage V head in about a year now. Thanks to all who joined in on this thread as I have really enjoyed reading it. Thanks again; Jim
=======================================
MoparPhil
Moparts Reader
Reged: 01/20/03
Posts: 46
Loc: Southwestern Ontario Canada
Thanks to all who have contributed to date. Streetwize, when are we likely to hear an update on your V's at Best Machine? We still don't have any pics posted on V's (One reason is I still haven't figured out how to post pics yet), but will when I get my computer skills sorted. I wish I had the combined knowledge of all you guys! Check out the # of hits on this thread, it clearly demonstrates interest and worthiness of the cause. Lets finish what we started.
===================================
Post Extras:
gator65
Moparts Reader
Reged: 01/20/03
Posts: 35
people taking an interest and looking is great. fast68 spits out so much info you almost need a road map to follow. i hope some of those lookers who don't understand all this will ask questions. this info is for everybody.
====================================
Post Extras:
Streetwize
Moparts Member
Reged: 01/20/03
Posts: 58
I hope to hear something back from Chuck next week, He said the 2.19" cut didn't mess up or take out the short side at all so I'm still hoping for good things, maybe he's got a few tricks up his sleeve. There's no reason that these heads shouldn't fit the bill. A big thumbs-up to Classracer sharing a good bit of his experience.
Wize
========================================
Post Extras:
gator65
Moparts Reader
Reged: 01/20/03
Posts: 35
street-wize, it was my hope that the heads that fast68 has will reflect a street type head, and yours more of a higher performance level. hopefully you'll see some positive numbers. the big valve is supposed to help in the higher lifts.
======================================
fast68plymouth
Moparts Member
Reged: 01/20/03
Posts: 50
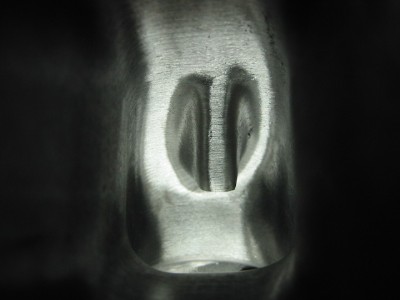
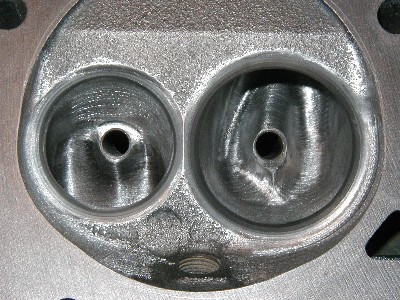
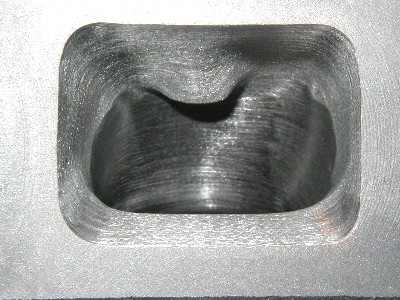
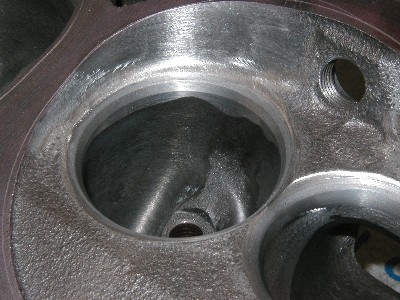
I got some pics.....
these are from the owner, after he ported them to the templates:
and after a little rework:
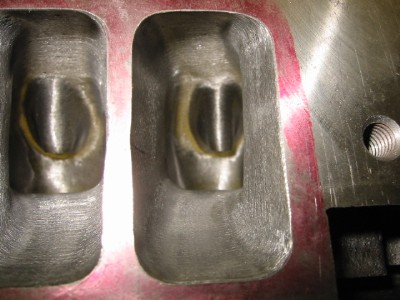
heres one of the guide boss and the floor at the short turn i like:
==================================
Streetwize
Moparts Member
Reged: 01/20/03
Posts: 58
Wow, that's some pretty Work, Dwayne!
What angle throat cut did you use and is the diameter below the valve still 1.92"?
If you were to go "one step beyond" on those to use a 2.19" intake using Classracers 90% formula there would go to ~1.98", and would you then feel the need to open up the port area at the roof and outside wall or would you leave it "stock". I think BlownCuda took the port out to 1/2 way between 906 and MW size. At what point in the bowl do you think it would outflow the port? It's pretty clear in the port entry pic that the V has a slightly raised floor vs the 906.
Also, what is the final width at the "pushrod pinch" vs an equally ported 906?
Great work!
Wize
=======================================
classracer
Moparts Reader
Reged: 01/21/03
Posts: 4
Loc: Orlando, Florida
Fast: Very nice work!
Street: The fomula I use depends of the lift of the cam. I have done some circle track heads with limited lift( .425" to .450"). On these heads I keep it down to 85% of valve size on the intake. On NHRA Super Stock stuff with lift approaching .800", I increase this 92-94%. This hurts the low lift a little, but helps out at the upper lifts.
As you can see the Stage V head is a good piece when modified. It's just not very good out of the box. The price is also way out of line. As a side note the casting quality needs to be improved some. I have seen some of the aftermarket SB & BB Chevy heads that were almost ready to go as cast. No big lips, special machining, or core shift. One modification I wish Mopar would do would be to add a bunch of metal above the exhaust port in the water jacket. Just fill it in like they did to the Hemi head. It would allow us to raise and reshape to exhaust. Thanks; JIm
======================================
fast68plymouth
Moparts Member
Reged: 01/20/03
Posts: 50
the pics of the port i reworked are the #1 cyl.
on this one, i went a bit bigger on the bowl diameter than 1.92. im at roughly 1.950, which is 91%.
if it had a bigger valve/bowl, id have to see how it was flowing before i decided if the bias needed to be put back into the port.
i really havent taken anything out of the pinch area at this point. it was much wider than a stock head to begin with @1.080(the stock heads are way less than 1.000), and im at about 1.090 now.
i dont really think the floor is any higher than a 906 head is, but the 906 has a more abrupt final approach to the short turn, and the V is more gradual.
if it is higher, its not much.
if i was looking for more out of these, id start by raising the roof, and trying to gain a little width at the short turn(since thats still the "problem" at this point).
i agree with Class on the exhaust. there needs to be enough meat there so you could eliminate the bias, and really scallop out the area adjacent to the guide boss.
======================================
Streetwize
Moparts Member
Reged: 01/20/03
Posts: 58
Let's see if this works, these are My Heads, not Gators. You can see the bowl work and the unshrouding around the valves in the chamber as well as the extensive work in the roof of the port transition into the bowl. The last shot is a side by side Before/After of the bowl area. All that looks to be left in the bowl is just a little blending.
I'm hoping to see some good flow numbers, You can tell Chuck at Best Machine does some first class work.
OH well, I told you Idon't know how to post pix!!
Wize
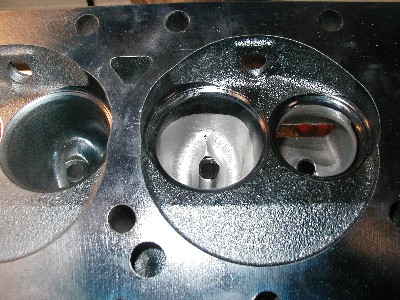
fast68plymouth
Moparts Member
Reged: 01/20/03
Posts: 50
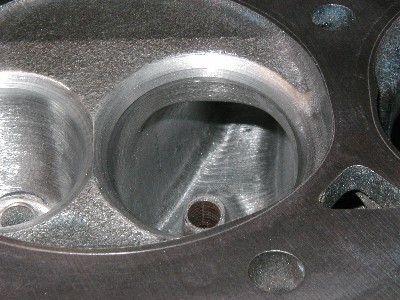
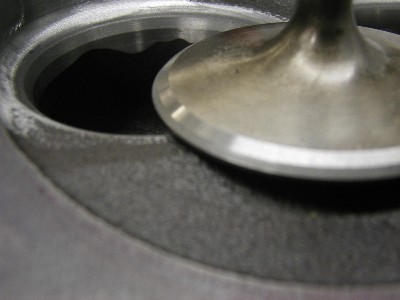
heres a few exhaust pics:
this may get a little confusing. the pics are of two different ports, and are mirror images of each other, so keep that in mind when youre comparing the two.
before:
after:
unfortunately, the pics dont really show just how much i took out of the roof near the guide boss, or the floor.
Wize, looks like he opened the area next to the guide up a little more than i did(which will probably help), and boat tailed the guide, where as i just removed the "lump" that was there.
=========================================
fast68plymouth
Moparts Member
Reged: 01/20/03
Posts: 50
actually, its an illusion from the distance the camera is away from the port.
i didnt enlarge the port opening at all on this port.
when i try and get the up close pics like this, it makes the ports look like a funnel.....when in reality the area at the guide boss is about the same width as the port opening.
=====================================
Streetwize
Moparts Member
Reged: 01/20/03
Posts: 58
Fast,
Yeah, like I said He's done a little more extensive work than I expected, you can tell from my Last shot the very basic bowl job that was done prior to Chuck getting in there. I'm assuming the bowl wasn't hogged out as much as Chuck had thought initially, it looks like his Serdi still found some "meat".
What else can you tell from the pix, Anything? Kinda hard to tell I guess.
Wize
=====================================
fast68plymouth
Moparts Member
Reged: 01/20/03
Posts: 50
cant really tell too much else, but i always find it interesting to see how other places go about doing their work.
i see he likes to use some sort of spray die/coloring to make it easier to see where youre cutting.
i guess since i learned how to do it without it, i just dont seem to need it.
the other thing is i see he and i work backwards from each other.
i like to cut the seats and bowls first, the do the porting after.
like i said...its just interesting to see how other shops get it done.
its like when i read some porting articles, and they'll talk about some proceedure they do, and i'll be like...."huh??".
you gotta remember....im livin in the sticks of Vt......we dont get much contact with the outside world
====================================
Best_Machine
Moparts Reader
Reged: 01/21/03
Posts: 18
Loc: Shelby, Mich
Dywane
I thought I would use some dye for the pics and I do cut the seat first in most cases these heads were already ported and I wanted to show Bobby were the port was to big as seen in Pic #3 the dark aera under the seat is bigger than I would like to see. On the intake seat I used a 35/45/60/75 cutter and topped it off wih a 4mm radius to a 30 for a total of 5 angles in 2 cuts. The red dye shows the location of the seat in the pic, the exhaust was cut with a 35/45 into a radius then to a 75. I will be doing some flow testing tommorow and will post some pic`s of the finished port work, the pic`s Bobby posted were roughed in ports, I will also be posting Flow #s of a port with only chamber and seat work.
Chuck
========================================
MoparPhil
Moparts Reader
Reged: 01/20/03
Posts: 46
Loc: Southwestern Ontario Canada
From what I see in the pics, the template work is a long cry from what the pros have accomplished. What was Mopar trying to tell us with those 11 pieces of shaped plastic? It's almost like they had a venturi theory that didn't amount to a hill of beans. I know I pushed the envelope in 'my interpetation' of the templates, BUT you guys went a hell of alot further. Wize, you have any numbers/dimensions yet? I would be lucky to emulate 75% of what is shown in the pics. 75% would obviously not get the flow as refined. It looks to me that you guys removed more in the intake bowls than other professional 906/452 heads I've seen done. Particularly behind the guide boss. I've seen that machined flat and narrowed. What you have done is ported like some of the Stage VI and W(whatevers) at the back of the bowl behind the guide. What is that much work worth in flow potential? It doesn't seem to hurt low lift #'s that much at all. As for the exhaust I think I was on the right track but more work required. It's probably impossible to show shortside work unless a head is cut apart with a saw. I can't wait to see the #'s Chuck comes up with. As for REAL TECH, this is one of the best threads I've seen since becoming a member. A heartfelt thankyou is in order.
=========================================
JCFcuda
Moparts Reader
Reged: 01/22/03
Posts: 8
Phil,
I think Mopar sets those up so you can improve what you have, without fuging the head up so bad where a pro cant fix it for you if you dont know what your doing.
Some people are not as gifted as others.
Ex :I want my money back I didnt know the water jacket there I followed the directions exactly.Yeh Right.
Jim
===================================
gator65
Moparts Reader
Reged: 01/20/03
Posts: 35
street-wize, it's great to see some pics. the machined relieveing looks to be superior to my gasket match and hand grinding. i think this professional work elevates the head a couple steps above mopar's big ideas.
fast68, your stuff is really looking good! can't wait to see the end results. i took my short block to the machine shop last friday, it'll be done probably first of next week.
=====================================
Streetwize
Moparts Member
Reged: 01/20/03
Posts: 58
Fast,
Yeah, I guess I've been "Backwards" all this time too I always start with the Bowl first.
Another thing common to Head Porters. Spend 3 days and nights Thinking, grinding, Drawing ports on Napkins at lunch, then more Grinding....On one Port!! Then take a few days to Re-couperate...then grind the other 7 on "Auto pilot" 'cause you've memorized every nook and cranny by Heart!
Phil, let's see what Chuck comes up with. I'm particularly interested in the VJ/Chamber work port VS the full-tilt port, we should see if all the guide and internal port work was worth the effort! I hoping so but you probably hope not!
On the one hand, I wish I could have sent Chuck a Virgin set to start; that way the bowl could be shaped exactly the way he wanted it. On the other hand, the only reason I can afford the rest of what he's done for what Chuck Quoted me is because a good bit of the port was already worked on, that would have been a lot more metal and time to dig out. Other than making the bowls a lil' too big, It doesn't look like Marty's Phase one work hurt them too bad.
Wize
==========================================
Best_Machine
Moparts Reader
Reged: 01/21/03
Posts: 18
Loc: Shelby, Mich
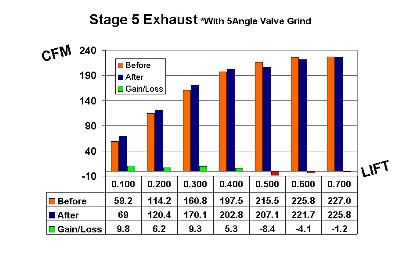
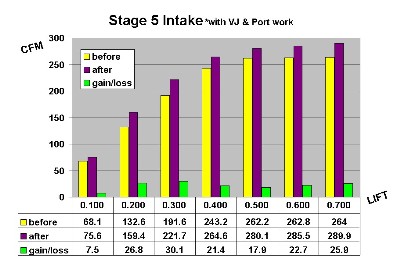
I flowed these heads before I did any work to them so I will make comparison of the flow number in relation to what I did. All test were done on a Super Flow 600 @ 28"; with a bore diameter of 4.320 (int Clay Entry, Exh w/2"X5" pipe)
The only work done at this time was a Valve Job (5 angle) and Chamber work.
Intake Before After
.100 68.1 72.9 + 4.8
.200 132.6 158.5 +25.9
.300 191.6 220.5 +28.9
.400 243.2 259.5 +16.3
.500 262.2 261.1 - 00.9
.600 262.8 272.1 +9.3
.700 264.0 275.1 +11.1
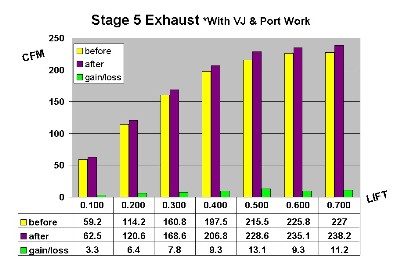
Exhaust
.100 59.2 69.0 + 9.8
.200 114.2 120.4 + 6.2
.300 160.8 170.1 + 9.3
.400 197.5 202.8 + 5.3
.500 215.5 207.1 - 8.4
.600 225.8 221.7 - 4.1
.700 227.0 225.8 - 1.2
This is what we had after working on widening the middle of the Intake Port and narrowing the Intake Guide, Minor short side rework. On the exhaust we Gasket Matched exit slight rework of short side, With the previous porting we werent sure how far they had gone so our porting was a little on the conservative side, We wanted to flow air not water.
Intake Before After
.100 68.1 75.6 + 7.5
.200 132.6 159.4 + 26.8
.300 191.6 221.7 + 30.1
.400 243.2 264.6 + 21.4
.500 262.2 280.1 + 17.9
.600 262.8 285.5 + 22.7
.700 264.0 289.9 + 25.9
Exhaust
.100 59.2 62.5 + 3.3
.200 114.2 120.6 + 6.4
.300 160.8 168.6 + 7.8
.400 197.5 206.8 + 9.3
.500 215.5 228.6 + 13.1
.600 225.8 235.1 + 9.3
.700 227.0 238.2 + 11.2
The Intake port size at the bottom of the 60deg cut is 2.005. Remember when I told you I thought the chamber needed to be reshaped for low lift number`s 28.9 @ .300 after that the port work took over, I was glad that we did not have to increase the port volume to much.
=======================================
fast68plymouth
Moparts Member
Reged: 01/20/03
Posts: 50
Chuck...nice numbers, and work.
you should try flowing the exhaust without the flow tube, and see how it sounds.
i had to take a lot more off the floor than you did to get the numbers to come around.
on my bench, once the exhaust port started to wake up, adding the tube was worth about 30cfm(went from 220's to 250's).
=======================================
Streetwize
Moparts Member
Reged: 01/20/03
Posts: 58
Chuck,
Yeah, almost 30 cfm @.200" and .300" with a little chamber relieving...Amazing!! Phil, you might want to note that especially, that kind of gain might have taken my 446" motor from 12.30's to high 11's without any other mods. That kind of % gain in the low and mid lift flow can be compared to turning a flat tappet into a roller!
The thing for a lot of people to remember is the area below the curve that is the most critical with a flat tappet cam, A F/T spends very little duration at peak lift by comparison.
Wize
=======================================
Best_Machine
Moparts Reader
Reged: 01/21/03
Posts: 18
Loc: Shelby, Mich
Dwayne, Ive always used a pipe, I feel that the port is so short that it wouldent be a fair test without, I would like to do more work on the Exhaust but I didnt see what the port looked like before and I dont have a sonic tester or a test head. I think the numbers we got will get Bobby where he wants to go
=======================================
6t5mopar
Moparts Member
Reged: 01/19/03
Posts: 64
Loc: Michigan
Well I wanted to put my 2 cents in so here ya go!
If you don't like how I did something you can :shocked: ME

========================================
Streetwize
Moparts Member
Reged: 01/20/03
Posts: 58
I've been looking at some old head flow #'s to see how these things stack up and I got to say these heads ought to really do the trick. To compare one heads' flow to another one of the more effective ways (IMO) to look is at the average of flows across three points from say .100"-300", .200"-400",.300"-.500", etc.
The reason being a valves motion flows through these points and IMO the flow between 1/3rd to 2/3rds of a cams peak lift is the about the most critical points because a valve passes through this lift area twice, once on the opening ramp once on the closing. Taking average numbers gives you a slightly better idea of power potential, at least in a street/strip dual purpose application.
For a baseline, I chose the "new standard" in High performance BB MoPar heads, The out of the box Edelbrock Performer RPM. To be fair, I would prefer to have had head flow numbers from the same bench (Chucks) but I'm going to use the numbers provided by our Primary provider of Hard-core Tech, Dwayne Porter (Fast68 to anyone who may have awakened from a coma within the past 2 years). These are right out of Carl's tech archives and I thank Dwayne for providing this great info.
Edelbrock I/E
.100.....67.3/56.1
.200....139.0/114.1
.300....204.7/164.4
.400....251.3/185.3
.500....273.7/193.8
.600....284.9/202.3
.700....286.5/205.9
Chuck said his bench reads high 260's, low 270's peak for the O.O.T.B Eddy's, that's about ~3% lower than Dwayne's # but close enough for what we're doing. 3% is well within normal variation from bench to bench, the best indication of repeatability is to make sure there's not significant deviations across the flow measuring points from one bench to another.
The reason I chose to baseline against these is that I came very close to buying a set, And had I done that for around $1200 I'd have had a killer set of heads no doubt. But I would have had to run them out of the box and wouldn't have had the $$$ left over to do anything else to them. Of course, I could have sold the V's but then...well we wouldn't have all these cool pix and charts & stuff to talk about besides the "If you could be reincarnated as a mopar, what kind would you like to be?" that seem to be popular topics anymore.
Anyway, lets look at just the intakes, my cam is .611" lift, looking at .700" is cool but not really as relevant to my motor but we'll add it since we have it. The difference is measured in percentage gain/loss, not cfm.
S V Ebrock % gain
.100-.300 average 152.2 137.0 (+10.9%)
.200-.400 average 215.2 198.3 (+8.5%)
.300-.500 average 255.5 243.2 (+5%)
.400-.600 average 276.5 270.0 (+2.4%)
.500-.700 average 285.2 281.7 (+1.2%)
What I'm trying to illustrate is that the averages can give you a more 3-D (if you will) picture of the flow, for example a 10.9% and 8.5%increase across a large percenatge of low mid lift is outstanding, and makes a bigger difference than just comparing the cfm diffrence measured at any one given flow would indicate. To me it's a much more telling comparison between heads. A head thats a dog at .200-.400 but comes on like a rocket at .450-up
won't work very well on the street. Averages can give you a little more to look at.
Anyway, a great post and a big Thanks to Dwayne and Chuck for all the great effort.
Wize
Post Extras:
gator65
Moparts Reader
Reged: 01/20/03
Posts: 35
Re: stage V stuff....continued
#26578 - 01/30/03 07:44 PM (64.12.96.78) Edit Reply Quote
street-wize, i've been looking at these numbers and comparing to flow sheet in the archives for days now. i've spent some money, but don't feel as if i'm giving anything in performance to edelbrocks. our numbers look better than indy sr's for a street-strip combo. i wish i knew how to quantify the gains. dwayne picked up 16% at .550 lift and almost 10% on the low end
========================================
Best_Machine
Moparts Read
Reged: 01/21/03
Posts: 18
Loc: Shelby, Mich
I thought I would share a couple Pic`s of the 30 deg back cut on the valve and of the Cyl with just the Valve Job and the Chamber work

=======================================
Streetwize
Moparts Member
Reged: 01/20/03
Posts: 58
Something not previously brought up that could be of some importance to anyone using Iron BB heads...I would think since the Stage V uses the same basic combustion chamber as virtually any '68 and later iron big block head, Chuck's Combustion chamber modifications related to the valve unshrouding could be of significant benefit for anyone that might not be able to swing the $$$ right now for edelbrocks or other aluminum heads.
Just a thought....
Wize
====================================
blowncuda
Moparts Reader
Reged: 01/20/03
Posts: 10
Loc: Bay Area,CA
Excellent work to all...I did not get any pics taken of mine as I got antsy to get the car going and could not find anyone with a camera. Looking at the pictures from Best and Fast I would say mine are similar only I have enlarged the runners a bit more. I to did a fair amount of unshrouding in the chambers as well. Also I use a larger intake valve as well.
After having done something to these finally I woudl stay with my first impression that they are glorified 906's. With no pushrod pinch They are good heads but WAY overpriced IMO. If they would be a good value if the price woudl come done a bunch. If you get a deal on a set they are certainly worth looking into.
Now for my limited results on the track. Because of the weather I have only gotten to make 6 passes and none of them were good. Made two the first time out only running 1/8 mile hard the more or less just driving it out. First pass off the trailer on the new bullet netted a 10.19 at 111. Only ran it hard through the 1/8th..Also no other info as the only incriments I got were 330(4.05) and 1/4 mile ets..Next pass was mopre of the same..Slipped off the line and ran it though the 1/8 at 6.30 @ 109.95 then coasted to a 10.43 at 95..The next weekend I went out and made 4 more passes with a few teetheing pains. First pass was a 10.11 at 137 with a horrid 60' of 1.57. Next pass another mediocre 60' of 1.41 and managed a 9.96 letting off at 128.33. Next two passes were totally useless thanks to operator error. I managed a 10.15 at 130 on 7 cylinders(forgot to put plug wire on and then a horrible 10.35 at 128 on 6 cylinders(not only did not see the wire off of #5 but left the #1 wire off too...duh). Not a whole lot of useful info here but at least I got down the track and back home in one piece. I am hoping to squeeze some .60's out of it hopefully.
Here is a quicky on the rest of the engine/car. 4.380" bore 4" stroke,aluminum rod Comp custom Roller(282/290)Stage V's,Wieand Team G,1050 Dominator..5600 stall,727TF,4.56 geared Dana 60 14x32 slick back halfed ladder bar car wieghing 3055 with me in it.
BTW I am thinking of buying a set of Edelbrock heads and doing some grinding and puttng them on the car to see what if any difference they will make...Anybody got a set they want to sell cheap Also been thinking of looking for a set of B1BS's as well.....
=====================================
MoparPhil
Moparts Reader
Reged: 01/20/03
Posts: 46
Loc: Southwestern Ontario Canada
Wize, I did the unshrouding work on my max-effort 906 heads. They are waiting to be run this spring and are presently installed on my high compression motor, so I have no feedback if they work well. Diplomat360 is going to try and teach me how to post pics tomorrow, maybe I'll be able to post what my V heads look like.
========================================

Tech Index