
Moparts Tech Archive
Big Block
E head pics
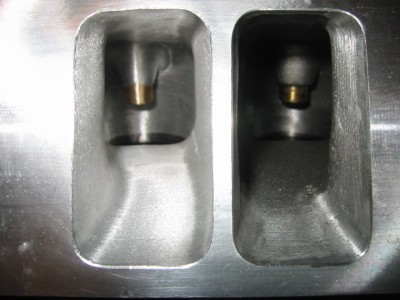
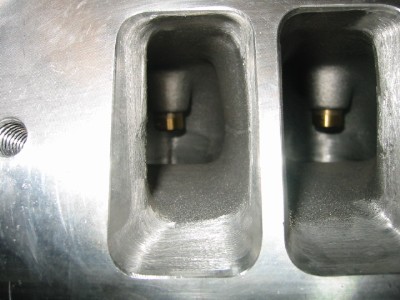
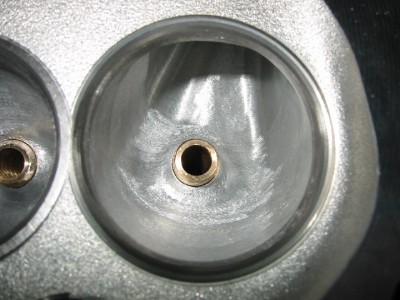
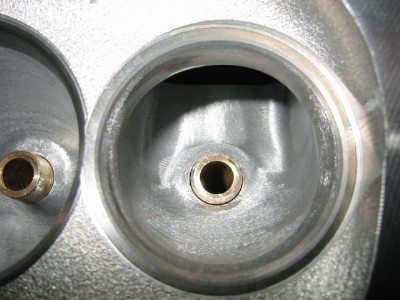
still messing around with the new camera.i have a set of E heads im working on and thought i post a few pics since no one except Chad got to see the test heads.
these ported intake and exhaust runners went 312/238 at 28".
the untouched ones are just for comparison.
312 cfm on the intake, now that is flowing well. Good work. I wonder if that fancy guide work is key? Are the intake dimensions about the same as the Test heads? ie. from the Tech Archives:
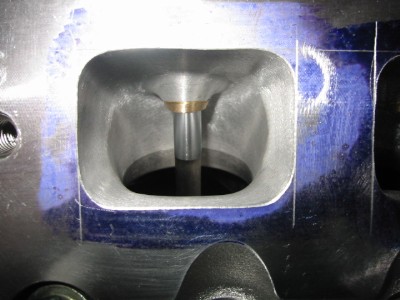
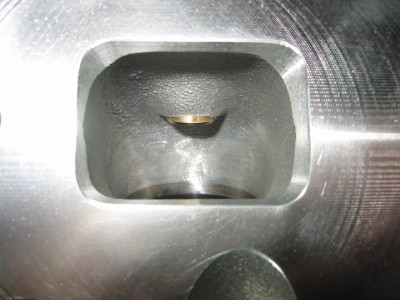
2.005" intake bowl just below seat
2.050" intake bowl, largest portion
1.165" width at pushrod bulge
I wish my Edelbrock's flowed even 300 cfm on the intakes. But they are stock except for evening out the pushrod bulge variations (1.045-1.100), making them all 1.110" which didn't change anything.
Jim, i havent taken any measurements yet, but i did go about .020 wider on the pushrod pinch than the test heads. i have been playing with the short side radius on the intake, and thats where i think i got the extra flow from. the guide and bowl prep was the same as the test heads so i dont think thats where it is.
this is the 4th set i have done, and one of the sets had a few ports flowing 314.
Valiant, yup this is one "stage" of full porting. those kinds of terms dont really do much to describe the level of work though. i could spend more time, or less time on the ports, and still have them be "fully ported".
basically with this job the customer told me to do what i could for about $8-900. so, that will get you what you see here, a touch-up of the seats, back cutting of the valves, but no chamber work.
these heads are going on a stroker street motor.
Dwayne,i know you posted measurements for the ports.what are you using as points of reference when you lay these out.also what kind of emery rolls are you using?do/have you ever used the craytex stuff.thanks
my place? not much to look at really. and where i do my porting is just a well lit bench that is right now covered with aluminum chips. dust we have...glamour we dont.i think i could get a few more cfm out of them, but not in the amount of time $900 will buy.
James.....basically when i know ive only got so much time to devote to the porting, i just keep track of my time as i go on the first intake and exhaust port and take out what i can in the amount of time i have. there really isnt that much "lay out" work when youre not taking the heads out as far as you can. after you have ported a few "zillion" runners you get a feel for how far you can go in a given amount of time.
i use sanding rolls from Standard Abrasives.
MOPAULY, equipment? uuuuhh, that would be a die grinder and a steady hand
i have the usual head porters assortment of carbides...but basically its just takes practice, like most anything else.
Mark G, im on Gregory Drive, next to "Add-On".
oh, heres a couple of bowl pics:
===============================
Topic: BB E head mild prep
fast68plymouth
Moparts Member
Posts: 3088
From: so burlington,vt usa
Registered: Aug 2000
okay, i tried a slight short turn modification to the #2 intake port in an effort to gain a couple of cfm at .600 lift.
there was a slightly different angle to the floor than one of the other ports that was working better at the higher lifts than this port was.
the result of 8 mins of dinking around was....nothing.
that little bit of extra material wasnt causing any problems at this point of the game.
then, i moved onto the exhaust port where i spent 5 mins removing the casting ridges. so far this exhaust port has 10mins of grinding time, and a narrower valve job than the "out of the box" port.
the exhaust flow at this point is:
lift---flow---gain (compared to out of the box)
.100--55.6- -1.0
.200-118.4- +8.7
.300-162.6- +7.3
.400-185.3- +3.6
.500-201.1- +7.3
.550-207.1- +9.7
.600-212.0- +14.6
.650-214.4- +14.5
.700-215.6- +14.5
IMO, this is a very worthwhile gain for the minimal amount of work done to the port, and starts working from .200 on up.
the next step will be to widen the port opening to 1.730, and polish the entire port. this will be the final step, and will basically be a duplication of the effort on the other two ports(#1, #7).
i also thought id do the intake mods to the #4 runner in stages as well.
the inside ports(like #4 and #6) are cast with the outside wall much closer to being vertical than the outer ports(#2 and #8), so i dont expect to see as much gain from the next step as i got from the previous 3 ports. however, i might just be suprised, and these may just end up being better with this amount of work than the outer ports are.
at this point i have 22 mins grinding time in this intake port, 16 of which was widening the pushrod pinch to 1.120, and polishing that part of the port entrance.
i know the polishing of this part of the runner does nothing for flow, but does make the heads look better, and frankly, most customers expect the heads to look that way when they get them. the polishing itself only adds about 3 mins per port to the job, so the customer is paying about $20 to have the port entrances look pretty.
the remaining 6 mins was spent blending the new 4 angle valve job into the bowl, eliminating any slight ridge from that transition of the 75deg cut into the bowl.
this is the comparison of the 4 angle valve job only vs the 22 mins of work.
lift-before/after
.100---69.4/69.9
.200--143.5/143.5
.300--207.1/209.5
.400--251.3/252.9
.500--276.9/276.9
.550--283.3/286.5
.600--288.6/295.8
.650--288.6/295.8
.700--288.6/295.8
as you can see, unless the cam was .600 or more lift, this modification would do almost nothing to make more power.
if this port responds to the outer wall and guide boss mods like the other ports, then there will be an increase in flow from about .300 on up.
we'll just have to wait and see what happens.
=======================================
fast68plymouth
Moparts Member
Posts: 3088
From: so burlington,vt usa
Registered: Aug 2000
posted 08-17-2002 07:22 PM
i took the #4 intake, and the #2 exhaust ports to their next levels of prep.
the intake got the outside wall straightened a little, and the guide boss was trimmed down.
as i suspected, since the outside walls of the inner two ports are more vertical than the outside walls of the outer ports, i got less of a gain from doing that part of the prep to this port.
all in all....it probably isnt worth the extra time going to this step from the previous step...except that unless youre flowing every port, you dont know if youve really reached the target 295cfm@.600 or not.
doing this last step does gain a few cfm, and will more likely insure you have reached the 295cfm mark.
this is where the finished #4 intake port ended up:
lift---flow--gain(from previous step)
.100--69.9- +0.0
.200-144.4- +0.9
.300-209.5- +0.0
.400-256.1- +3.2
.500-278.5- +1.6
.550-289.7- +3.2
.600-297.6- +1.8
.650-299.4- +3.6
.700-301.1- +5.3
as you can see, on this port the biggest gains are at lifts the valve will never see on this motor.
the #2 exhaust port was just finished off the same as #1 and #7. the port was widened to 1.730, and the walls and roof were blended back into the bowl, then the port was polished with an 80 grit sanding roll.
the numbers were very close to the matching port on the other head(#7), but were a little better in the mid-lifts.
lift---flow---gain(from previous step)
.100--56.1- +0.5
.200-119.9- +1.5
.300-166.2- +3.6
.400-190.2- +4.9
.500-205.9- +4.8
.550-210.8- +3.7
.600-213.2- +1.2
.650-216.8- +2.2
.700-218.0- +2.4
the numbers with the flow tube are:
lift---flow
.100--57.1
.200-125.7
.300-176.2
.400-205.9
.500-226.5
.550-235.0
.600-240.1
.650-246.5
.700-251.3
the flow tube really wakes up the numbers on the exhaust side of these heads.
so, the bottom line is, there are a few small incremental steps that can be taken before you get into a "fully ported" type of situation.
depending on the final engine combination, prep similar to this, or being run out of the box, or fully ported, could result in power output that is noticably different between the various levels of prep, or barely any different at all.
in any case, im confident that these heads will improve the power output of the "default 600hp" motor, even if the final CR ends up being 1-1.5 points lower than the original 13.4:1.
unfortunately the budget is not going to allow a follow up dyno test, so the results of the swap will have to reveal themselves at the track.
Minor Ebrock BB head prep...part 1
fast68plymouth
Moparts Member
Posts: 3348
From: so burlington,vt usa
Registered: Aug 2000
posted 08-10-2002 06:02 PM
i have a set of BB E heads that ive just started working on that will be replacing the 452/906 heads that were on the "default 600hp" motor thats in the tech archives.
the customer decided to sell the iron heads before they cracked, and were still worth something.
he isnt really looking for any real performanc gains, but isnt really excited about the possibilty of going slower either.
his old iron heads were milled a bunch, and the motor was a true 13.4:1cr.
we dont want to "use up" the new heads by milling them to the limit on the first go around, so V/P clearance permitting, they will be getting milled .045, and what ever that gives us for compression is what we'll live with.
the motor originally had the 1009's, but they didnt last that long, and we'll be using the 1039's to avoid the bore overhang problem.
this is also going to drop the CR a little as well...which isnt a good thing.
so, in order to try and keep the car at least at its current performance level, a little minor head prep is going to take place.
the thing to keep in mind with any brand of castings is that they arent all the same to start with. some flow better than others, so looking at a set of published numbers for a product doesnt necessarily mean thats what the set you bought will flow. they might be better, they might be worse.
in an effort to offset the power the motor will be losing from the reduced compression, and added heat energy transfer of the aluminum vs the iron, a minor amount of porting is going to be done to sort of maximize the potential of the castings, without greatly altering the port configuration, or making them much bigger.
here is a sample of what the heads that came off the motor flowed. this is the 906 head, #7 cylinder:
lift-----in/ex
.100---67.9/55.1
.200--140.8/109.7
.300--199.9/155.3
.400--241.7/173.2
.500--268.9/184.1
.550--275.3/189.0
.600--276.9/192.6
.650--276.9/195.0
.700--278.5/198.6
i tested #1 and #7 of the new E heads as they came out of the box. while they are better than the 906 heads that were on the motor, they arent that much better. and, the 906 intake runners were under 200cc's, and the E heads are at 210cc's before porting.
this test is two fold. i wanted to get the heads in a state of prep that would make it likely that the car would be faster with them than the old heads, and to also show that a little prep can bring the weaker ports on these heads to where they should be.
i selected #1 and #7 because they looked like the weakest two cylinders of the available 8.
the pushrod pinch was the narrowest, and the head bolt boss bulge protruded into the port the most.
when people buy these heads they are expecting 290-295ish cfm from them.
they dont all flow that, and ive had some ports only go mid-270's out of the box.
these two ports werent quite that bad, but fell shy of the 290 mark.
the plan is to try and get them to 295/225 by .600 lift.
if those numbers are achieved, then i think the added flow will more that out weigh the heat energy absorbed by the aluminum, and the loss of compression.
here is how these 2 ports flowed "out of the box"
intake flow:
lift-----#1/#7
.100---67.9/66.9
.200--139.9/130.9
.300--203.5/202.3
.400--248.1/248.1
.500--272.1/272.1
.550--278.5/280.1
.600--285.0/285.0
.650--285.0/285.0
.700--286.8/286.8
these two intake ports were very close to each other at this point, it will be interesting to see if my slight reworking has much of an affect on that.
the exhaust ports werent nearly as close-
exhaust flow:
lift-----#1/#7
.100---55.6/56.6
.200--111.2/111.9
.300--159.3/144.4
.400--184.1/178.0
.500--199.9/190.2
.550--204.7/195.0
.600--208.3/197.4
.650--209.5/199.9
.700--210.8/202.3
this is a fairly low budget job, so only a minimal amount of porting will be done.
the plan at this point is to:
-narrow the valve job and back cut the valves
-open the pushrod pinch area to 1.120
-slight blending of short turn into intake bowl/ valve seat
-diminish/lessen the head bolt bulge
-widen exhaust ports to 1.730
-increase/lengthen radius of short turn on exhaust port floor
-mild polish of exhaust ports
i should have some results of how that all worked out Monday evening.
=========================================
451 Jim
Moparts Member
Posts: 2568
From: Lexington Park Maryland
Registered: Dec 2000
posted 08-10-2002 09:19 PM
This should be very interesting to us "budget" Edelbrock headed BB people. I appreciate the info, Dwayne (thanks)!
Old 906's #7: .600--276.9/192.6
Edel stock#7: .600--285.0/197.4 (#1: 208.3)
Looks like the Eddies out of the box were a little better than the ported 906's. This is a good start.
From my simple work on the exhaust ports (from your advice), your proposed work should produce big gains for minimal work (lots of aluminum, but carbide cuts fast). I got 25 to 30 cfm gain going to 1.75" with no bowl/seat work.
I didn't do much to the intake, so unless you have some real quick secrets, I don't think much gain will come from 30 minutes of work. But then again, you are much better at this than me! The valve job work might produce most of the results at low lifts. I hit 288-295 @0.600" on the intakes (#1,#3), i.e. almost no change, maybe 5-7 cfm. I did do more to the head bolt bump after flowing after Brad pointed it out.
From 1009's to 1039's, did you consider the Detroit gaskets? I am using the MP orange #P4529455, which I understand are Detroit Gaskets. But I have almost zero chamfer on this particular block. Or is his bore chamfer that bad? (Dam Chrysler QC)
What was his head cc on the 906's? I wish the Eddies were 75cc or less from the start.
=========================================

Tech Index