
Moparts Tech Archive
Tech Misc. Info
E-body floor replacement
mopfriedMoparts Member
Posts: 204
From: columbus, Ohio USof A
Registered: Jan 2001
posted 07-05-2002 06:52 PM
I have cut out and mocked up my new drivers front an rear floor pan. I removed the four speed hump to replace a weak section along where it meets the floor near the firewall. I left plenty of material on the original and on the replacement floor. I have it vicegriped at the firewall flange and bolted thru at the seat supports and c clamped at the cross member. I really cant decide if I should cut and flange, just plain overlap, or try to but weld.If I just overlap, how much should I overlap? I have some weld thru primer. Any sugestions?
============================================
Dbeast
Moparts Member
Posts: 360
From: Browns Mills NJ
Registered: Feb 2002
posted 07-05-2002 09:40 PM
Personal preference? Overlap with a flange tool and spotweld. If going correct resto, but, tack, tig, grind, etc etc,
============================================
mopfried
Moparts Member
Posts: 204
From: columbus, Ohio USof A
Registered: Jan 2001
posted 07-05-2002 10:42 PM
Its gonna be a driver, a 1970 318 std converted to a 440 6 pack with a four speed. Its on a rotisserie, if I knew it was as rusty as it was, I would have cut it up.
============================================
fast71
Moparts Member
Posts: 812
From: Old town,fl,usa
Registered: Oct 2001
posted 07-05-2002 11:02 PM
you are too far to turn back now,just flange and spotweld,lots of quality seam sealer and get out of there!! sounds like a very nice worthy project!
=============================================
replacing front drivers' floorpan in Challenger
KillerBee
Moparts Member
Posts: 420
From: N.E. Ohio
Registered: Sep 2000
posted 07-03-2002 02:27 PM
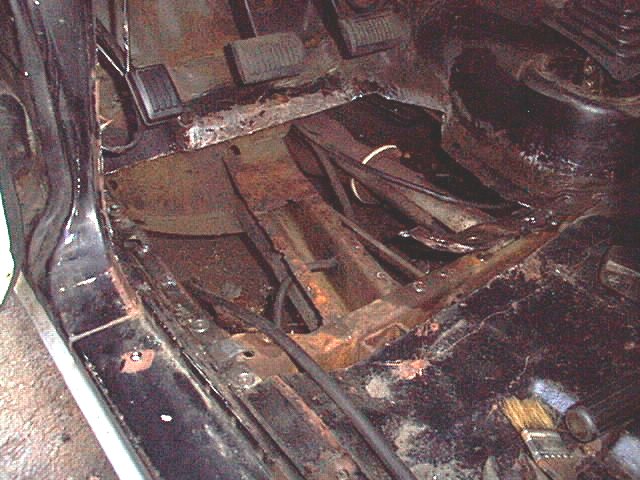
Well the time has come to replace a bad patch job on the front drivers' side floor of my Challenger.
Typical patch job done many years ago over a rust spot right where the drivers' feet go, (it's amazing how the rest of the car's floors, trunk, and frame are rock solid perfect).
I bought a full stamped factory repop drivers side floor pan section to install. It appears the new section is more than enough to cover the bad area of the floor, I would like to replace the entire floor section instead of just weldind in a patch cut from the new section.
I'm planning on trying to remove and prep the area the best I can then taking the car up to a restoration body shop and have them do the welding.
I haven't removed the entire interior to get a good look yet, but from looking at the floor area it appears there is a seam covered with factory filler the runs along the floor under the pedals, then the seam comes back next to the trans. tunnel
(4 speed car) and then back across the the floor under the seat.
Is there spot welds under the filler?
Is it best to remove the filler and drill out the spot welds?
How does the floor pan connect to the body under the door and near the rockers?
What else needs to be cut to remove the section.
Is the floor connected to the frame anywhere.
As you can tell I've never done this before and I would like to do it right this time.
I know plenty of members have done this job before and their results look fantastic.
Thanks in advance for any comments, advice, warnings, pictures and/or articles that can help.
============================================
Fraser
Moparts Member
Posts: 161
From: Ottawa, Ontario, Canada
Registered: Dec 1999
posted 07-03-2002 03:36 PM
A few things to think about before you get started. Replacing the floor is a lot of work. You will encounter two types of seams. The first where you weld the new panel into the existing floor. No seam exists here now. There are two types of welds used to do this. The easiest and quickest to do is the lap weld where the existing and new panels are overlapped by about 1/2" and attached by brazing or tack welding. The disadvantage of this method is the seam is visible and no matter how well you seal it moisture will inevitably get into the seam and start rusting. The second type is the butt weld where the edges of the two panels are aligned and then a bead run completely along the length of the seam. This can be done using MIG, TIG or gas welding equipment. Gas or TIG will result in an invisible weld, MIG you will see a slightly raised area when finished. The decision depends upon what the your intention is with the car. If a points restoration use gas or TIG. If a nice driver MIG is fine. MIG equipment is less expensive than TIG and you are more likely to find it in a body shop. Gas requires a lot of skill. Bottom line expect to pay less for a MIG joint. The second type of seam is the factory spot welded seam. Try to duplicate exactly what the factory did here. I would strongly recommend that you section your new floor panel and replace only the area of the floor that is rusted out. You will save a lot of time and work replacing only the area that is necessary. You should also talk to the person who will do the welding before you begin to determine what method he will use and what preparation you need to do.
Re your questions, there shouldn't be a seam running along the floor under the pedals and along the transmission tunnel unless the foot wells have already been replaced at some time in the past. The floor was all one piece from the factory. It is welded to the firewall at the front, the rocker panels at each side and likely to the rear compartment and trunk floor at the rear. These were spot welds. Drill out the spot welds using a spot weld cutter where necessary and remake new ones in the same location. There will be stiffners and the torsion bar mounts spot welded to the bottom of the floor as well. A word of advice to the welder. Make the spot welds to the stiffners and torsion bar mounts before doing the seam welds otherwise the floor will oilcan and you will have a difficult job making the stiffner spots. Best of luck with this project!
============================================
Lionfish500
Moparts Member
Posts: 228
From: Wilmington, Delaware
Registered: Jul 2001
posted 07-03-2002 06:48 PM
This is my first total resto and I'm learning as I'm going (I'm not perfect). My goal for my car is to do everything myself (Not necessarily perfection LOL). You noticed that the above was a disclaimer!!
You can buy a Mig welder for the price that some body shops want to do this job. A small one runs on household voltage. Its very easy to teach yourself. Mine came with a video.I also took alot of pics as I did it>
http://hometown.aol.com/sunocchio/index.html
I layed out the full pans and traced the outline. I then used a grinder with cut off wheel and cut out the floor(it was all thin). I left about an inch boarder (watch the frame and park brake cable underneath etc..)I also had to trim the pans a little because they weren't perfect. I cleaned the area with a wire wheel. I stitch welded with the MIG every 3 inches for about an inch. (after practicing for only a day). I had to butt weld against the 4 speed hump. I then primed and painted on top. I used the rope seam sealer on top like the factory.I got underneath with 3M seam sealer in a caulk gun and shot all of gaps (less than 1/4" gaps). This keeps the water from laying up in there(I plan for only Sunday drives anyway). I then primed painted the underneath. I referenced the seat bolt holes before I cut out the pans to make drilling and mounting the seats easier. Most of all, talk to the people on this board. Thanks to them I did it!
Yes, by gas welding I was refering to oxy-acetylene. The technique is called hammer welding because you need to stress relieve the weld as you go using your hammer and dolly. It is very slow and requires lots of practice to be able to do it right. But done properly the results are impressive. The weld is flat and distortion free. It can be finished using a high build sandable primer and you would never know that there was a seam beneath it.
============================================
1970GTX
Moparts Member
Posts: 395
From: Poughkeepsie, NY
Registered: Jan 2002
posted 07-04-2002 11:20 AM
--------------------------------------------------------------------------------
I'm doing the floor in my Roadrunner right now. Here's how I am going about it. The pic is not the best, but, I cut the pan out up to the middle of the crossmsember so that you wont see the weld from underneath. I drilled out the spotwelds where the pan attaches to the rocker. I cut about 3" below the sealed seam that connects the firewall to the pan, because those spot welds are difficult to get to. Since it's a four speed car, I ground the welds where the tunnel attaches to the pan and will use that piece as a template on the new pan. If you have an automatic car, that part will be easier.
============================================
info provided by members listed above

Tech Index